Okay it's time to get dirty...
Here's my recent decisions:
- Since I'm not planning on playing electric much, it's crazy to upgrade the preamp just for the tuning function.
- Using a Snark or other clip on tuner is just as crazy - perfectly good tuner is sitting there, built in to the bass ready to be used.
- All I need to do is add a switch to turn on the preamp.
- I could tap into the connection that goes to the jack and wire another switch in parallel, so that it still is activated when plugged in or when the switch is flipped. Won't you forget and leave it on - killing the battery? Maybe an LED status indicator is needed? The tuner has a "heartbeat" blink when active and since I only plan to use this for the tuner, the tuner will always be activated - causing it to blink. I was thinking of a mini toggle switch, since that's what's used in electric guitars, but think a rocker switch will look better.
Found these mini rocker switches on Amazon. They look good and they're small - very discreet. Unfortunately, I haven't ordered them yet...
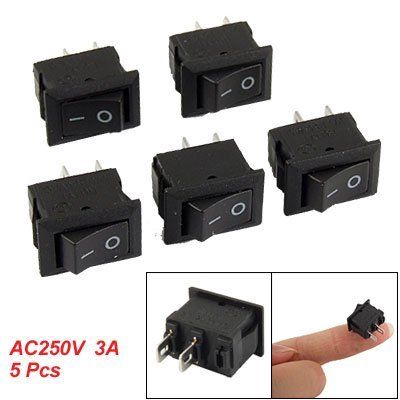
But I'm anxious to get this project moving...
Let's start with the wiring...
- Remove the 4 screws that hold the preamp in. and lift it out of the bass's body.
- remove the 2 plugs - the small one is to the pickup and the larger one is to the jack. Tape them so they don't fall back into the bass body - otherwise you'll be shaking them out...

The preamp should look like this. the remaining red and black wires are to the 9 volt battery and aren't removable on the preamp side.

Remove the two nuts that hold the jacks in place. This will allow the metal cover to come off the back of the unit. Which looks like this.
We want to tap into the mini stereo jack on the right of the picture. There are 2 circuit boards in the preamp and lots of fancy electrical thingies we don't want to damage...

To get to the solder connection to the jack, we need to get to the other side.
I found out the top board is held in place with pin connectors.
I gently pried the board loose with a non-conductive prying tool (left over chopstick found in the silverware drawer...)
Here is the preamp with the top board removed.

Here is the top board. The 3 solder connections on the upper right are to the jack. it's a stereo jack though the signal is only mono. The audio is on the tip of the plug, the switch lead comes in on the middle ring, and ground on the top ring. We want to tap into the top solder joint and the lower/middle one.


Now it's reassembly time. I plan to run my new wires out of the preamp case with the power wires. So with the wires running away from the jacks, I snapped the top board back in place.
Next, I put the metal cover over the preamp. This took a little bending, since the metal is soft and it needs to fit snuggly.
I put the nuts back on the jacks and plugged the 2 cables taped to the side of the bass back into the preamp. Not hard to figure out which goes where. Make sure both are completely in, or something won't work...
The preamp needs to be angled into the cutout so the the plugs can make it through, then leveled out so that the edge of the other end of the preamp case will fit in.
Since I didn't have my switch yet, I'm just going to leave wires dangling out. I just need to touch the wires together to tune - that is if this worked...

Now with the wires connected - Voila! the tuner is on.

Now to order the switch and install it...

No comments:
Post a Comment